The 10 Best Social Media Automation Tools in 2025
Discover the 10 best social media automation tools for 2025. Streamline your social media management, boost efficiency, and enhance your online presence with expert insights.
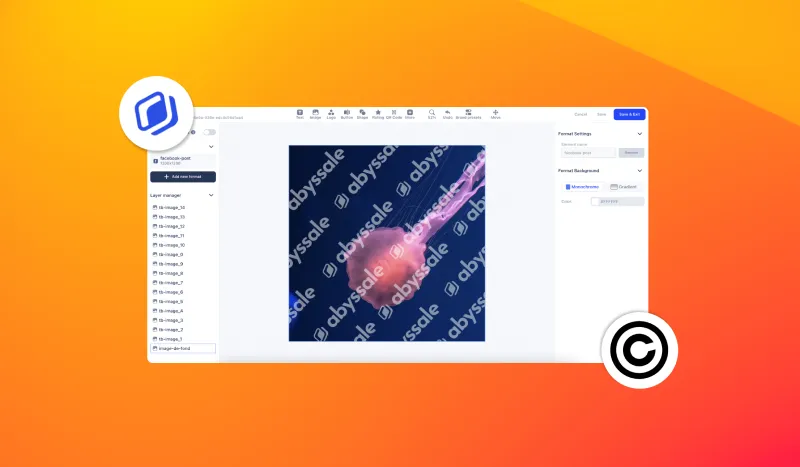
While browsing the web, you have most likely already come across images with a watermark. It is also called "watermark". These are translucent symbols that let the image appear while making it unusable for other purposes. In fact, this practice makes it possible to protect the copyright while indicating the owner of the image.
This is a great way to discourage people from stealing the image or using it without permission. This technique can also be used to indicate the date or location of the shot.
In this tutotial, we will explain step by step how to apply a watermark to your photos with Abyssale
Putting a watermark on your photos doesn't present any particular "technical" difficulty. It's quite simple to do by following these steps:
From your dashboard, click on Create New Template > Create from scratch.

Select your template type (static) and choose the image format (you can apply your own dimensions by clicking on "custom dimension").
Once you're inside the template builder, insert your background image and adjust it to the size of your visual. In our example, we will imagine that you want to apply your company logo on the image.
Upload your logo image with a transparent background. ⚠️ Make sure that the background is transparent. Otherwise, the result will not be what you expect.
Also, the color of your image will determine the appearance of the watermark. We recommend loading your logo in white for best results.
Once this is done, select your logo. Then in the right column, play with the opacity and lower the "Image Opacity" slider until you get the right balance so that your logo can be seen without impacting the background image.
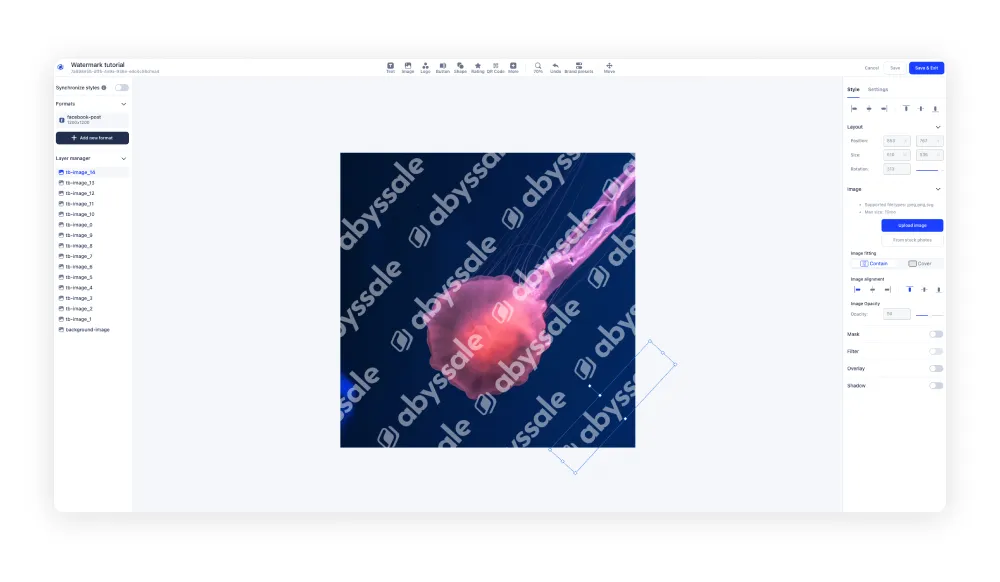
Once you are happy with the result, click "Save & exit" and generate your image.
You may need to generate a watermark with your logo that appears multiple times. Only, you want to manage the spacing between each for a uniform result.
In this case, copy and paste* the logo you just generated and on which you have already applied the opacity.
(*) To do this, select the logo and press Ctrl + C on your keyboard to copy the image. To paste it, simultaneously press Ctrl + V as many times as you want the logo to appear.
Once this is done, your mission is to inflict a uniform spacing between each logo. In this case, play with the position values in the right column layout.
You may need to reuse this watermark on other photos. To do this, the operation to follow is very simple.
Before generating your visual, delete the background image you applied at the beginning of the operation. In the left sidebar, select the row corresponding to this image and click on the trash can.
Your watermark is almost ready. You have one last step left!
Make sure you deselect all the elements of the visual. Then, in the right sidebar, under Format Background, select Monochrome and click on the color. Next, turn the opacity slider all the way to the left. You can also change the "A" value to zero. You have just removed the white background, your watermark is finally ready!

Click on "Save and exit" and generate it visually.
Save it in a folder where you can easily find it whenever you need it. When the time comes, just upload it as an image to your template with Abyssale.
You know everything about protecting your photos with your own watermarks. If you have any questions or comments, please let us know.
To keep up with the latest updates and news about Abyssale, join our LinkedIn community!
Explore our guides and tutorials to unlock the full potential of Abyssale's spreadsheet feature for scaled content production.