Automatically create images with Make (ex Integromat)
In this tutorial, our goal will be to automate image creation thanks to Abyssale & Integromat. This will allow you to save time if you create social media content on a regular basis
We've all come across these little looping visual animations on the Internet. They're made up of video extracts or short illustrations. Often humorous, these little animations are known as GIFs (Graphics Interchange Format). They convey emotions that mere words cannot.
They are popular for their relatively small file size and compatibility with many browsers and platforms.
In this article, we'll give you 5 good reasons to use animated GIFs for your communication. Then, we'll explain step-by-step how to create GIFs with FFmpeg.
GIFs are everywhere these days. Some brands and companies have clearly understood their power and don't hesitate to use them for their online ads or even in email marketing sequences.
User attention spans have never been as limited as they are today. Social networks, which have become limitless suppliers of dopamine, have a lot to do with it. GIFs stand out from conventional multimedia content. They capture the consumer's eye and tell a story.
Capturing users' attention isn't the only challenge on the Internet. It's all about keeping it. GIFs are perfect for communicating key information quickly. You can use them to present product features, special offers or to explain complex concepts. Try to create a GIF that's dynamic to prevent the user from moving on before your message is finished.
Isn't it said that to sell, you need to arouse strong emotions in your prospect? Well, GIFs are the perfect tool for this. When you publish written content, it's sometimes difficult to convey the right emotion to your reader. GIFs solve this problem and help to generate enthusiasm or excitement in them. Some even use them to add a touch of humor to their text. In this age of infotainment, it's a great way to keep readers' attention.
Compared with text-only or static images, GIFs are often more engaging. They encourage prospects to interact, creating a more human and emotional relationship. If used correctly, GIFs can also help readers to memorize information. It's a cognitive bias: humans tend to remember better things that surprised us or aroused strong emotions in us.
The possibilities in terms of creativity are limitless with animated GIFs. They let you develop your branding by adding your own personal touch. To do this, you need to create your animated GIFs yourself.
Good timing! That's exactly what we're going to explain in the rest of this article. To do this, we'll be using FFmpeg. It offers total control over conversion parameters, flexibility in the formats created, efficient file compression and the ability to automate certain processes. What's more, it allows you to extract precise frames from a video in order to insert them into a GIF.
Before giving you the steps to follow to create your animated GIFs with FFmpeg, let's talk about the scenario we want to create.
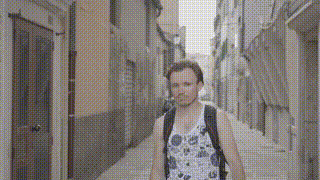
The aim is to make videos, below is a GIF representing the following scenario:
To begin with, store these videos in a folder that's easy to find. For our example, here's the path we follow: C:\Users\Utilizer\Documents\Video_to_GIF_FFmpeg
Now that everything is in place, you need to invoke FFmpeg. You'll need to install it first. You can do this at http://www.ffmpeg.org.
Start by opening a command window to use FFmpeg. To do this, simultaneously press the "Windows" key + "R". Then type "cmd" in the dialog box and press "Enter".
Now that the command window is open, you need to navigate to the directory where your videos are located. To do this, use the command "cd" followed by the directory path. In our case, the command would be: cd C:\Users\Utilisateur\Documents\Video_to_GIF_FFmpeg
⚠️ Make sure to replace "User" with your real username.
Now that you're in the right directory, you can add the FFmpeg command to create GIFs. Here's the one we'll use to create our GIF:
ffmpeg -i Lunette.mp4 -ss 12 -t 2 -i Enfant.mp4 -filter_complex "[0:v]fps=10,scale=320:-1[v0];[1:v]fps=10,scale=320:-1,setpts=PTS-STARTPTS[v1];[v0][v1]concat=n=2:v=1:a=0" -pix_fmt rgb24 output.gif
Your command must be adapted to your needs. We will therefore explain this command in detail so that you can modify it to suit your needs:
Once you've executed your command, FFmpeg will start creating your animated GIF. The duration of the process will depend on the length of your videos and the power of your computer.
Once the process is complete, you'll find your GIF in the same directory where you stored your source videos. You can open it from any browser or image viewer.
Here's what our GIF looks like:
You've just created your first animated GIF with FFmpeg from 2 videos. Now you can take things a step further by adding subtitles to your GIF. To do so, we invite you to read our article "How to add subtitles to your videos with FFmpeg".
If this tutorial seems too difficult and you'd prefer a simpler solution, use a video generation API such as Abyssale. It will enable you to do the same thing without having to write a single line of code.
Explore our guides and tutorials to unlock the full potential of Abyssale's spreadsheet feature for scaled content production.