The 10 Best Social Media Automation Tools in 2025
Discover the 10 best social media automation tools for 2025. Streamline your social media management, boost efficiency, and enhance your online presence with expert insights.

There is no better advertising for your business than social proof. Social proof is testimonials from satisfied customers who tell about their experience with your business and recommend you to other consumers. Google reviews are a great example.
Unfortunately, not everyone has the reflex to go to your Google My Business page. So how do you get these testimonials visible to your entire community? If your audience doesn't go to the testimonials, we'll help you get the testimonials to your audience.
So in this article, we're going to walk you through step-by-step how to automate the posting of Google reviews on your social media using Make for automation and Abyssale for visual creation.
The first step is to connect Google My Business and Make.
If you don't have a Make or Google My Business account. Start by creating an account on each platform.
Then, follow the steps step by step on this link allowing you to connect your Google My Business account to Make.
Now that Google My Business and Make are connected, the goal is to collect all of the comments from Google users about your business and list them in a csv file.
We want this file to update automatically and add a new line for each new comment. The information we want to collect is: the commenter's name, their rating out of 5, their comment and possibly the date.
Good news ! The scenario already exists on Make. You just have to click on this link.
You will need to select your Google My Business account and then connect Google Sheets. If you can't do it, you can find the procedure on this link.
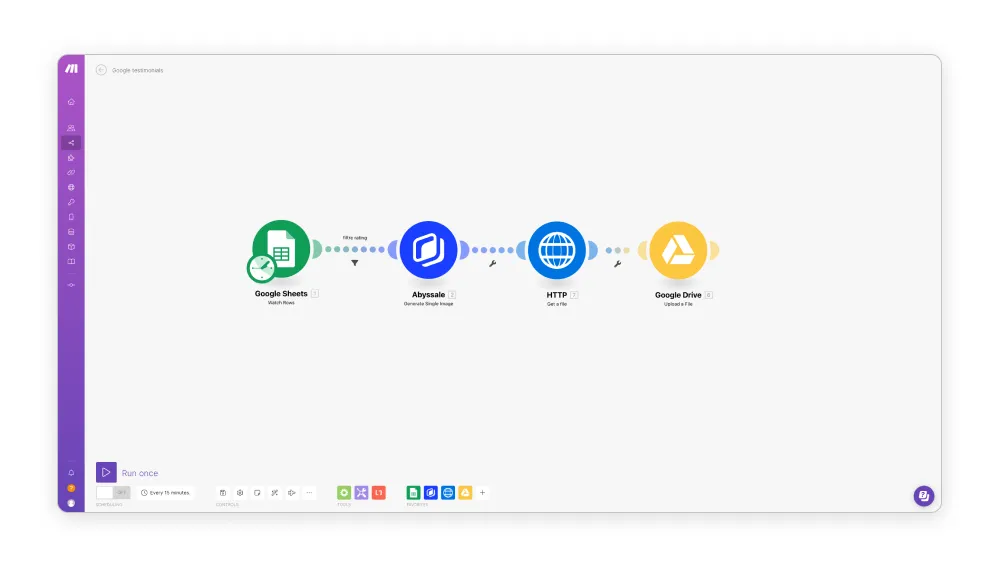
That's it! We have automated the data collection in the csv (Google Sheets).
Now, as soon as a new row is added to the Google Sheets document, we want to automatically create one or more visuals for social media to transcribe the comments.
If you haven't already done so, you need to prepare your template on Abyssale.
To do so, go to your Abyssale dashboard > Create a new template. In the template builder, you can either choose a designer-made template from our library or create one from scratch. For the sake of the tutorial, we're gonna create our own.

Create a new template and name it whatever you want. For our example, we'll name it: Google Testimonials.
Select the format(s) you want to create.
Insert all the visual elements for the visual aspect of your template (image, logo, etc).
Then add a text element. This will display the customer's comment. In the right column, go to setting and rename the element: "testimonial". Save it.
Do the same thing for the user name and the publication date. Again, name these elements. *
(*) You don't have to create all these elements. If you do not want the date to appear, for example, do not create the element.
For the rating, you can insert a rating element that allows the stars to appear.
Once your template is ready, click on "save and exit".
All that's left is to create a new Make scenario to automate the creation of a new visual each time you add a new row to the Google Sheet.
Before going any further, you need to give numerical values to the rating in Google Sheets, which for now are in the form of "FIVE", "FOUR", etc. This will be used later to display the rating next to the comment on your visual.
To do this, from the Google Sheets document, add an F column that you will name "Rating number" to cell F1.
On cell F2, note the following formula: =IFS(B12="FIVE";E12&"100";B12="FOUR";E12&"80";B12="THREE";E12&"60";B12="TWO";E12&"40";B12="ONE";E12&"20")
Click on the cell and drag it to the bottom of the document (line 1000). The empty rows should show "#N/A".
Now you can create a new Make scenario.
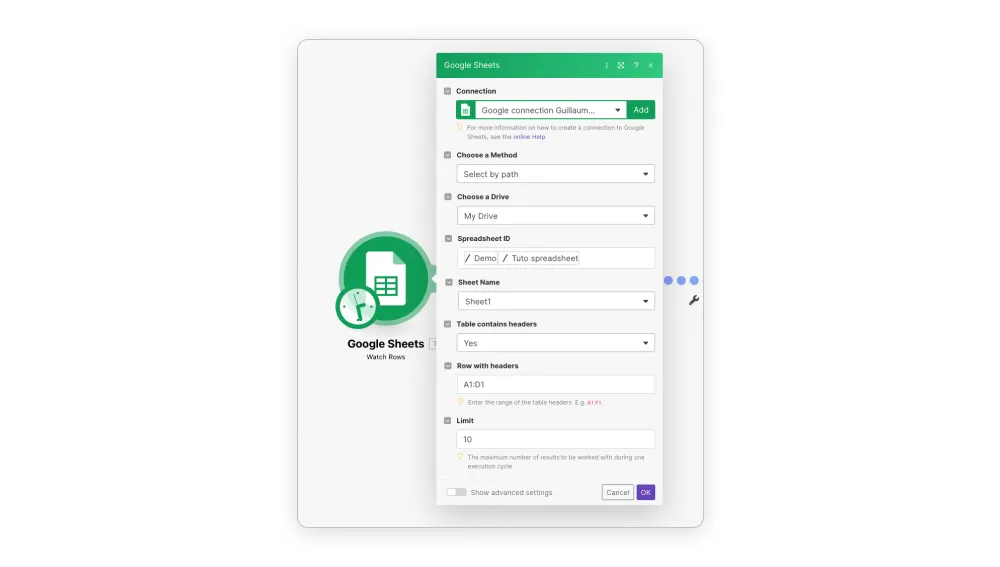
Select the Google Sheets module "Watch rows" and connect the previously created document. Remember to select "yes" in the "Table contains header" category and enter "A1;F1" in the "row with header" category.
Add a new module to the Make scenario by clicking on the "+" symbol next to your module and look for Abyssale. Select "Generate a single Image".
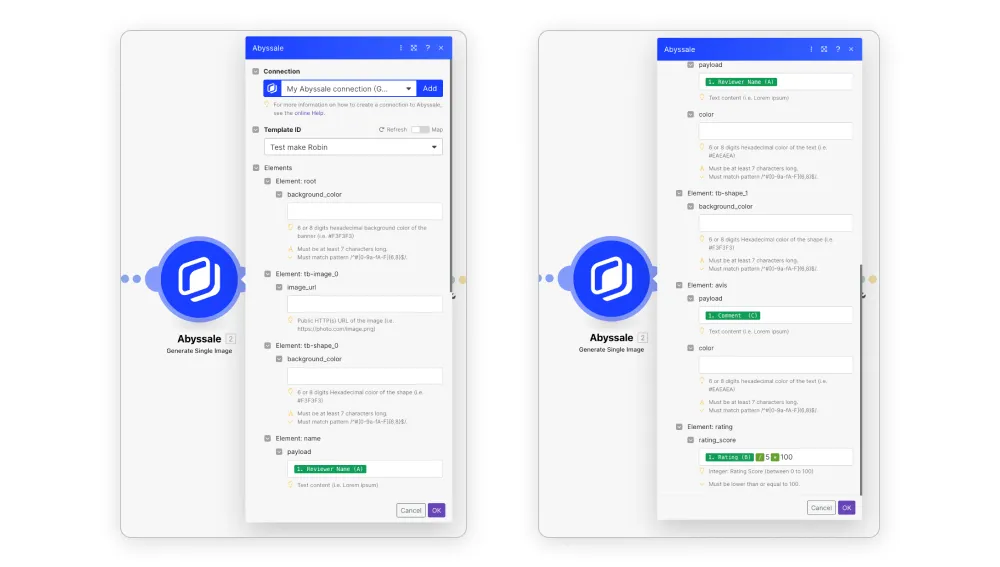
Select the template you created earlier. In our example: "Google Testimonials". Then in each of the rows representing an element of the visual, select the corresponding value on the Google Sheet.
To avoid generating negative comment images, here's how to do it: We will only take comments with a 4 or 5 star rating.
To do this, from the Make scenario, click on the wrench between the Google Sheets and Abyssale logos. Then select "Set up a filter".
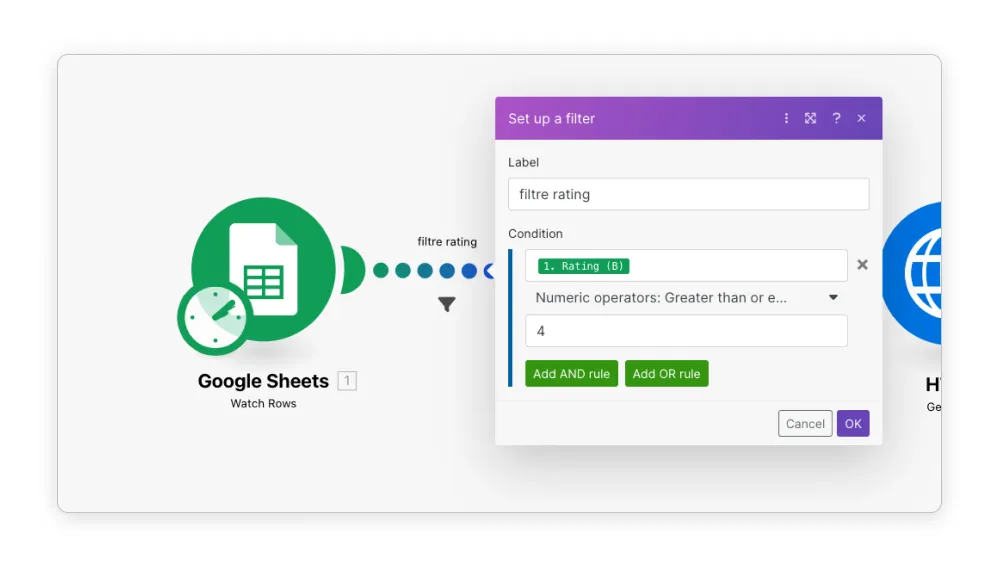
Name the filter and in the condition line, select the value "Rating number". Click on the arrow below and select "Numeric operators : Greater than or equal to" and enter the value 80 below.
This way, you will only generate visuals for comments with a rating greater than or equal to 4.
This is the last step!
Add a new module and search for HTTP. Select the "Get a file" module to download the file from a URL. In the URL line, select "File URL".
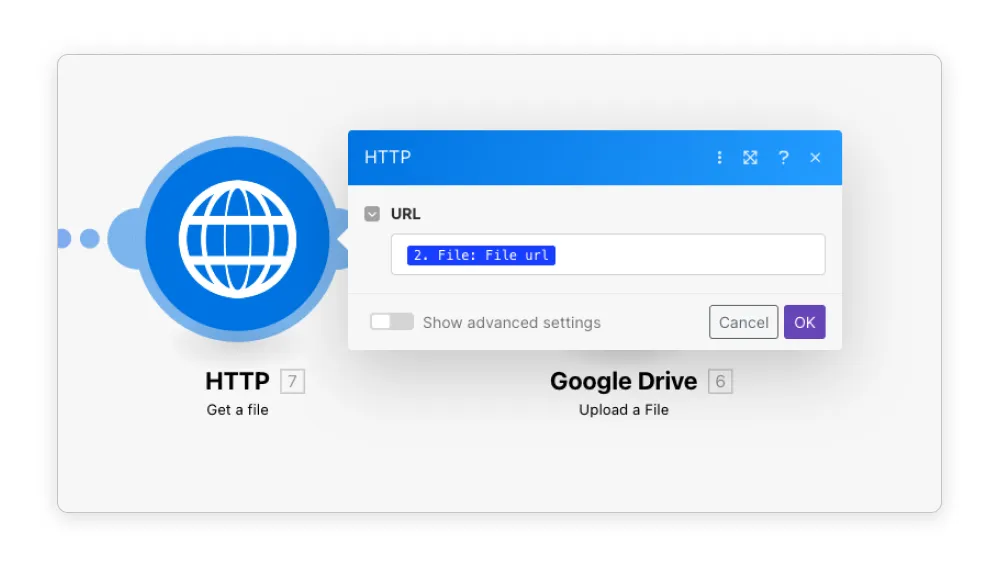
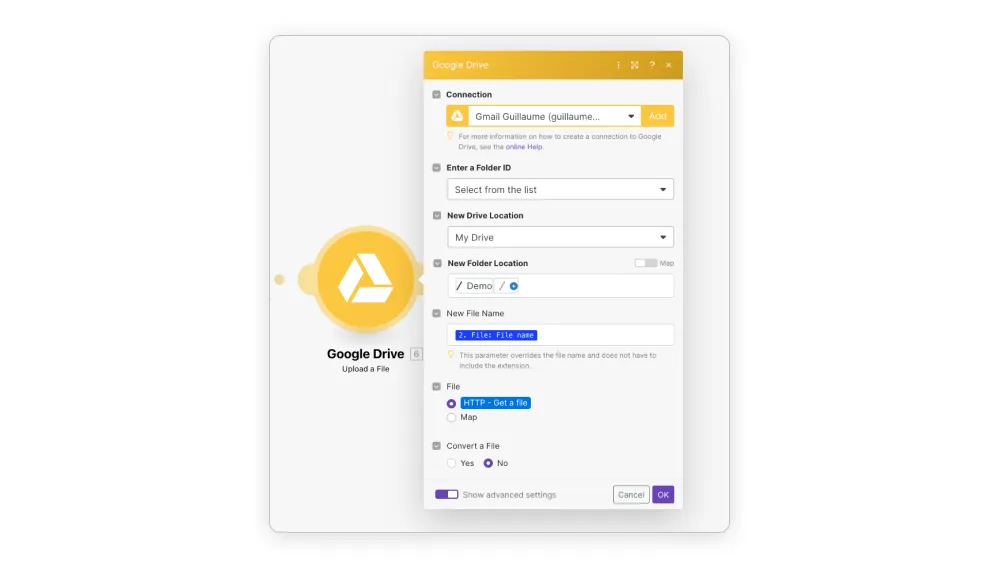
Add a new module to select the drive where you want to drop it. In our case, we will search for Google drive and select the "Upload a file" module. But you can also choose another storage system. All you have to do is fill in your storage conditions (the name of the file, the folder in which you want to store it, etc.).
Your automation is ready! 🚀 Don't forget to save it and test it.
You can now retrieve the visuals directly in the corresponding folder in order to publish them on your networks.
If you have any questions or comments, please let us know!
To keep up with the latest updates and news about Abyssale, follow us on LinkedIn!
Explore our guides and tutorials to unlock the full potential of Abyssale's spreadsheet feature for scaled content production.