How to generate a custom shipping label for your Shopify store
Abyssale makes unboxing memorable for your customers. Learn how to automatically generate shipping labels for your Shopify store.

Mailchimp is a great tool to automate email marketing campaigns and personalize emails. Sending emails is already automated, but you might also want to automate the creation of personalized images for these emails. That’s what we’ll do today. We're gonna create dynamic images for your next Mailchimp campaign thanks to the Abyssale Dynamic image feature. If you're using another like SendinBlue, you can check-out this article.
To allow the personalization of images for each contact in our Mailchimp subscribers list we'll use a technologie called dynamic images. This technologies makes it possible to edit the content of an image based on the content present in it's URL. Its possibilities are limitless as you can inject any type of data inside your URL (text, colors, other images...)
To make you familiar with it, we'll cover :
In order to illustrate this with a tangible case, for this tutorial, we’ll take the following exemple:
Let’s say you're a SaaS company that wants to create a personalized drip email sequence for your clients in Free trial. As their free trial is crucial for their conversion, it is your chance to show that you have great personalized support & onboarding. You want to create an automated Mailchimp campaign with 3 emails.
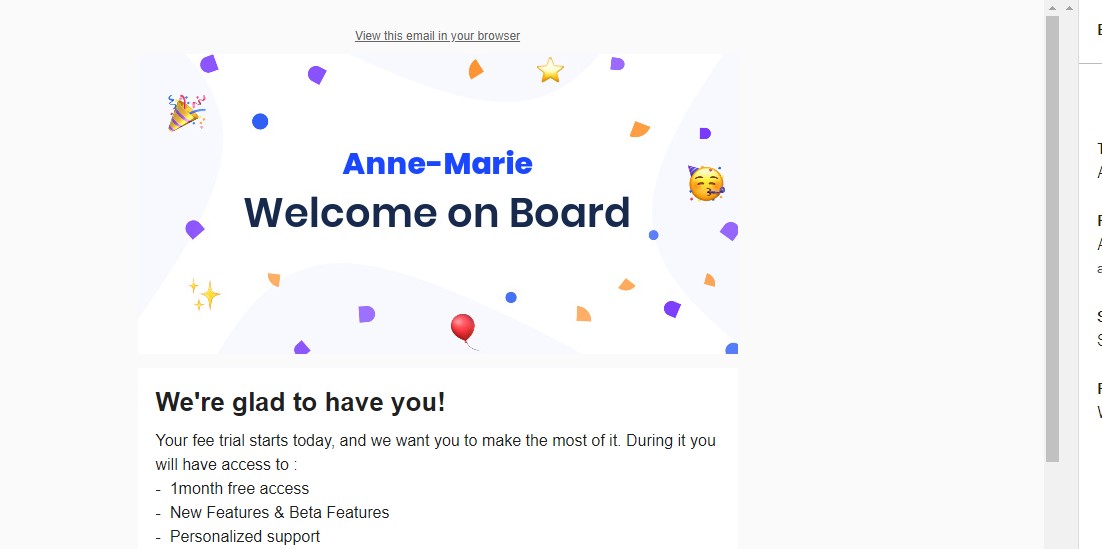
The goal here is to create a personalized email banner displaying both to customer information and its step during the free trial. Of course, creating this banner wouldn't be possible by hand, so we're gonna automate this process with a dynamic image.
First, you have to design the template of the email header. This template will serve as a base to auto-generate all your Mailchimp dynamic images.
In your Abyssale account, go to your Dashboard and click on "Create New Template" > Browse templates. On the left section of the builder, in "Templates" click on "Public". Choose an email template. Then edit your template.

It's import to name the layers of your template properly. This will be of great help later when will be matching them with our Mailchimp merge tags.
For example, in our case, we will rename the “Welcome aboard” layer with “trial_step” → as its content will change in our 3 different types of email.
We also name the “John Doe” layer, “lead_name” as it has to match the name of each one of our contacts who will receive our Mailchimp dynamic image.
Finally, we make sure our template is in the right format. A great size for a Mailchimp email header is 600x300px. When you’re satisfied with your template's design, save it.
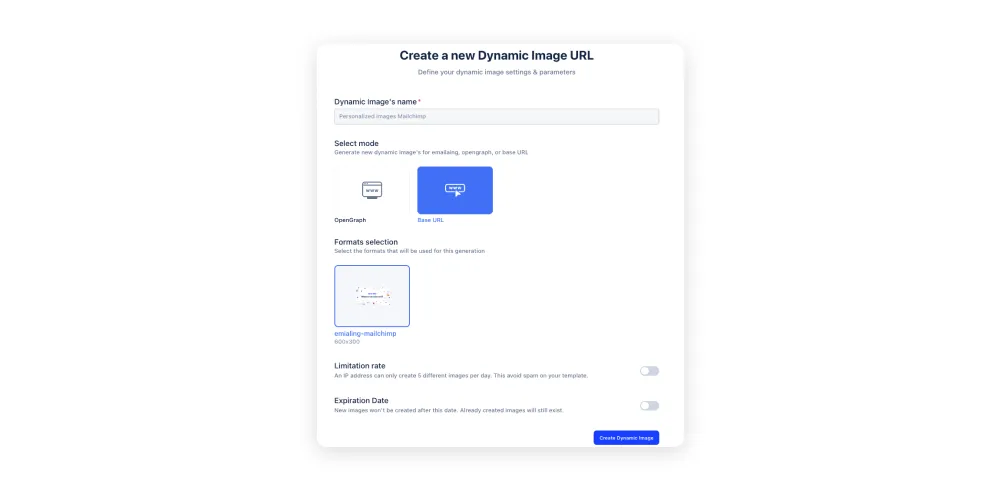
Abyssale will now propose different ways to generate images. To deliver Mailchimp dynamic images, we'll choose the Dynamic images method.

The next step is to give your Dynamic Image a name, select the Base URL mode and click on "Create Dynamic Image".
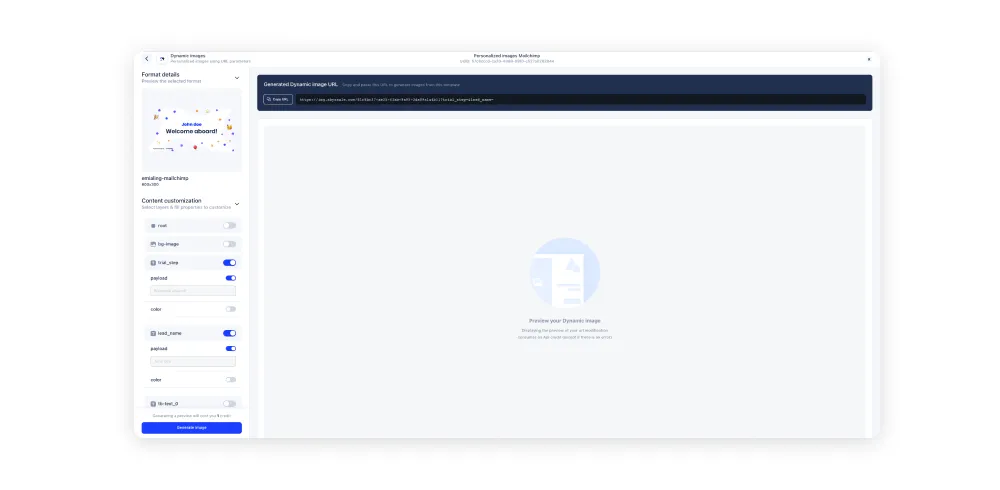
Now, when building your dynamic image URL, make sure to switch on the layers you wish to edit with your Mailchimp Merge tags. Here we switch on, our trial_step payload and our lead_name payload, to be able to personalize those fields in our email. As you switch them on, you will see that new data is included in the link preview on top of the screen. When you're done, copy this link before moving to the next step.
Now log into your Mailchimp account, and create a new email template.
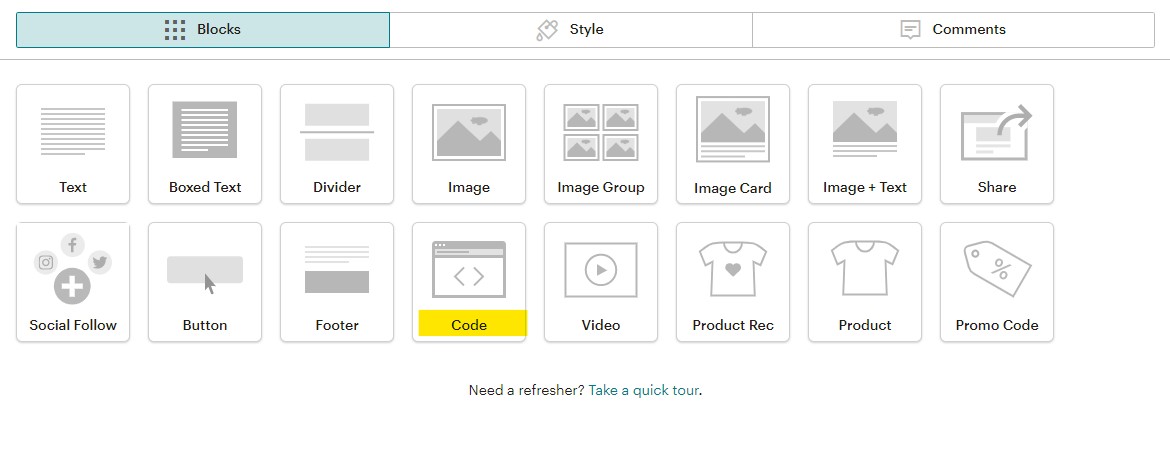
To add your dynamic image to your email template, you won't be able to use the regular image bloc. In order to mix our dynamic image url and our Mailchimp merge tags, we'll need to use a custom code bloc. Place this custom code bloc where you would like your Mailchimp dynamic image to be displayed.
Now what we have to do is to include our Abyssale dynamic image URL inside this code block. At first your code block should look like this :
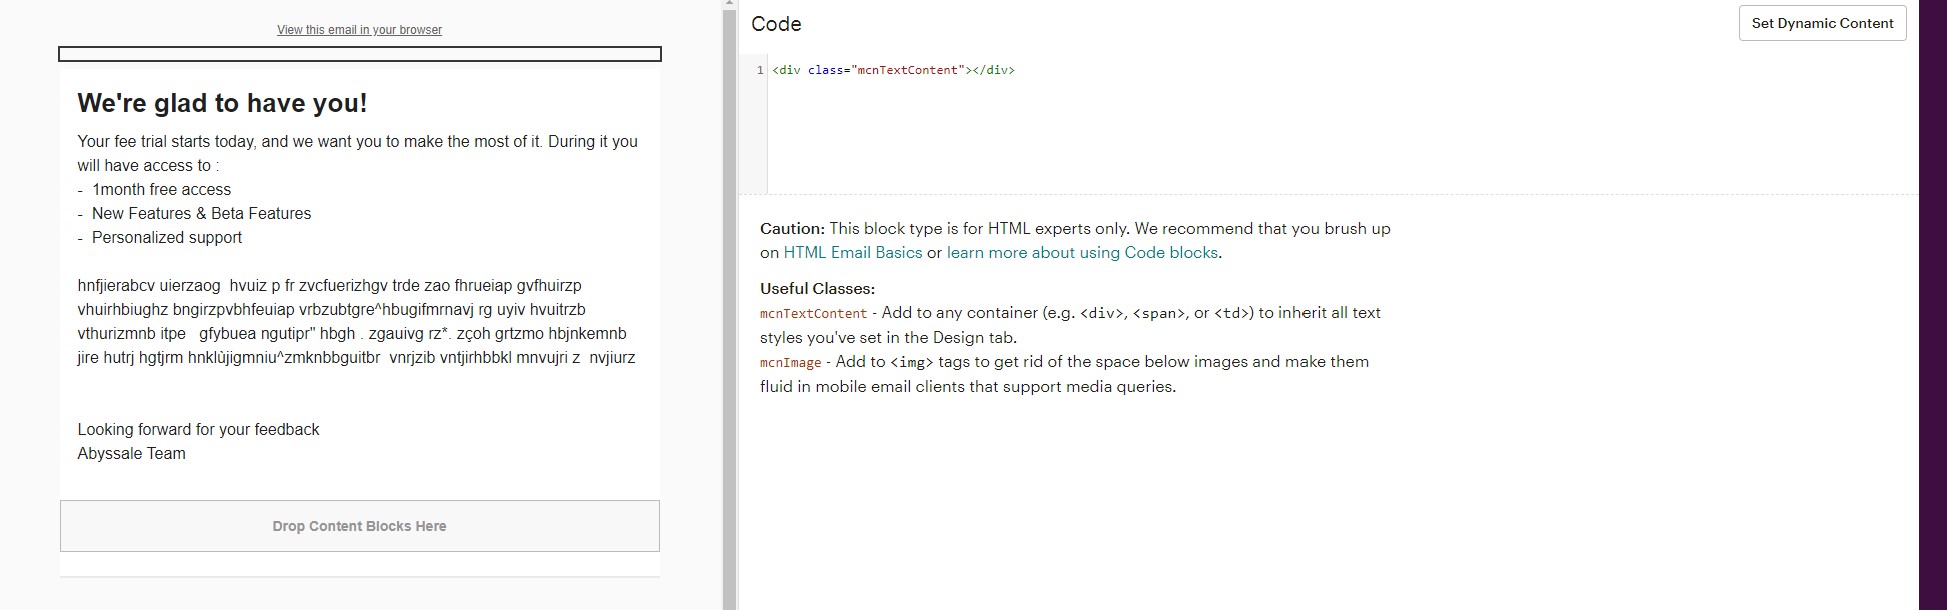
We'll have to add an image src line to this code inside the first div that we see. Between the 2 >< signs is where you'll need to add the following code :
Your code should look like this:
<div class="mcnTextContent"> <image src= "https://img.abyssale.com/81c8bc37-ae35-41ab-9a95-3da09a1a4b11?trial_step=&lead_name="></div>
You can see the trial step layer we’ve created on Abyssale and the lead name layer. It is these layers that will be personalized in our email.
As it is the first email of our campaign we will add “Welcome onboard” after the trial step layer code. For the lead_name layer, we'll use a Mailchimp merge tag to insert a different value for each one of our recipients. As we want to use the first name of our contact, we'll add the *|FNAME|* merge tag. Our code should now look like this :
<div class="mcnTextContent"> <image src= "https://img.abyssale.com/81c8bc37-ae35-41ab-9a95-3da09a1a4b11?trial_step=&lead_name=*|FNAME|*"></div>
If you want to use any other merge tag than the first name one we've just used, you can find a detailed all the default merge tags on this list.
This being done, you can Save & Close your code block
To check if it worked, click on Preview > Enter preview mode 1 > enable live merge tag info. You should see your email containing your beautiful mailchimp dynamic image just like one of your recipient.
For reference, here is our preview:
Now we will repeat these steps for our 2 other emails, the Support email & the Conversion email.
The steps are the same and what’s great is that the Mailchimp dynamic image URL is also the same !
In the code bloc we will just add a different trial_step text and replace "Welcome on board" by "We're here to help" and "Ready to join us?".

Once you’re done, you can add your email template to an automation workflow to send your 3 emails at a specific time after your contact has subscribed to your mailing list. To be sure your Mailchimp dynamic image works, we recommend that you always test your emails before pushing them live. You can send “Test emails” via Mailchimp, and then verify that the layer lead_name=*|FNAME|* is really changing according to your recipient's contact info.
Explore our guides and tutorials to unlock the full potential of Abyssale's spreadsheet feature for scaled content production.
.webp)