Send personalized images in Mailchimp emails
Hyper personalize your emailing campaigns using Mailchimp dynamic images! Add your merge tags to a simple dynamic image URL and let Abyssale do the rest.
We receive a lot of LinkedIn direct messages on a daily basis, and it can sometimes feel redundant and kind of boring. This is why companies try to stand out from the crowd of daily cold messages the users they target receive.
One good way to do that is to use personalized Linkedin images, whether it is for sales to promote a product, to invite people to an event or even for recruitment purposes.
In this tutorial we’ll show you how we create a recruitment campaign on Linkedin, using a Waalaxy Linkedin message campaign and Abyssale Dynamic images.
What is a dynamic image ? Basically, when you create a template in Abyssale, you can generate images from it with a link. You'll simply need to add a parameter like "FirstName=" to your URL followed by a contact property like #FirstName# to personalize the First Name layer of your template with your contact's first name when you send it. This will automatically send a Linkedin message with a personalized image
To make things more relatable, we'll follow the following use case for this tutorial :
We are a SaaS scale up and we need to recruit more talents to support our growth. We’ve opened several positions and knowing that the recruitment process takes time, we want to automate the reaching out to candidates and differentiate ourselves.
Our task today is to create a Linkedin message campaign for each one of the following open positions : Marketing officer, Brand strategist and Full stack Developer. Each campaign will target a segmented list of talents matching the job requirements. Each talent will receive a personalized image, inviting him to apply to our position.
The first thing to do is to create the template of the image we want to send. Create an Abyssale account and go to your Dashboard. There, click on "Create New Template".ou can choose from a large range of public templates.
As in this case we’re running a recruitment campaign and to speed things up, we’re using this HR template available in the Abyssale public templates library.
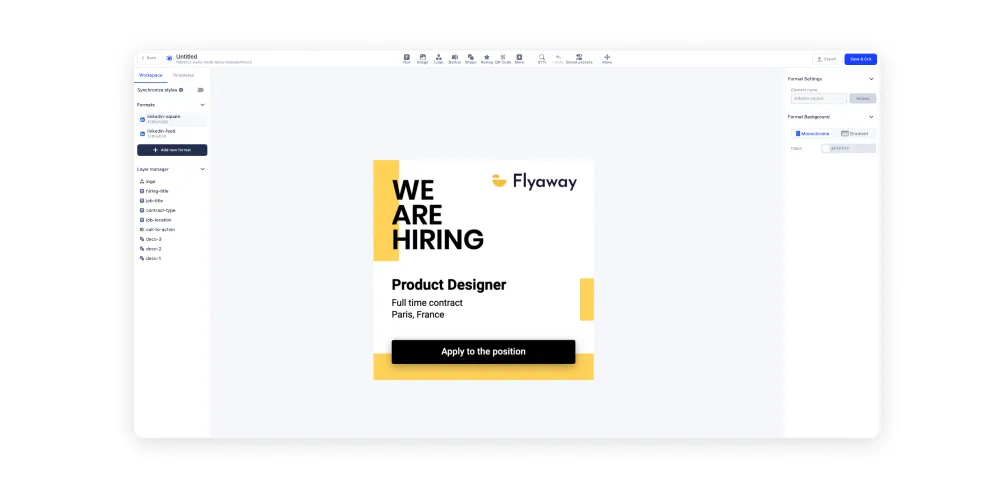
When creating a template in Abyssale, you should always pay attention to the name of your layers as it will later help you match your content with the right layer during the image personalization process.
Here, for the exemple, the layer we’ll personalize is job-title layer according to the position we want, and so on( you could also add a name layer to personalize even more your content). We’re also paying attention to the format we want to use, here we created different ones, in order to be able to reuse this template for other purposes.
Once we’re satisfied with our design, it'll be time to create a dynamic image URL.
After saving your template, scroll down to see a “Generation Methods” section. Here you have to choose “Dynamic images”. If you want to learn everything about Abyssale's Dynamic Images, check-out this page.

Next, you'll have to give your Dynamic Image a name, select the Base URL mode and the format. When you're done, click on "Create Dynamic Image".
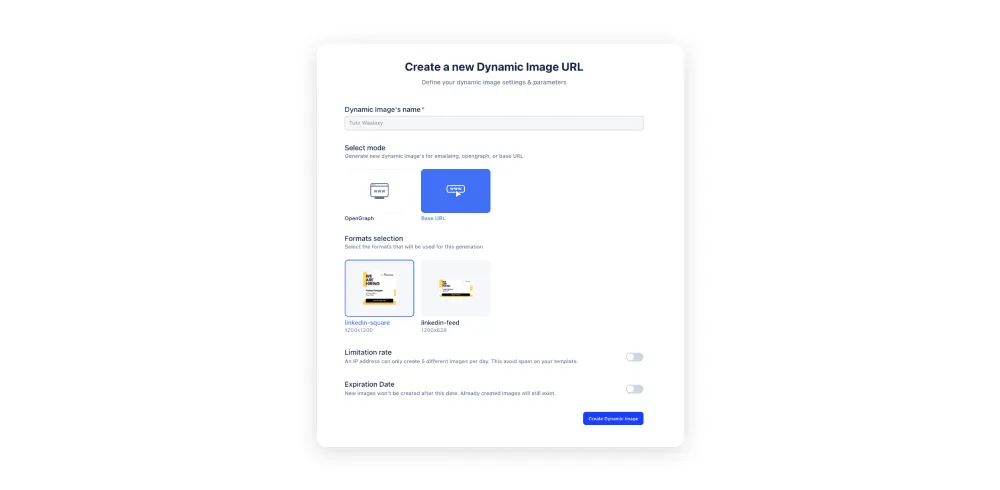
It is now time to build your URL thanks to the Dynamic image URL builder. First, select the format you need. Then select the layers you’ll need to personalize by switching on their payload toggle. As we said before, here, we’ll personalize the layer job-title, so we select it.
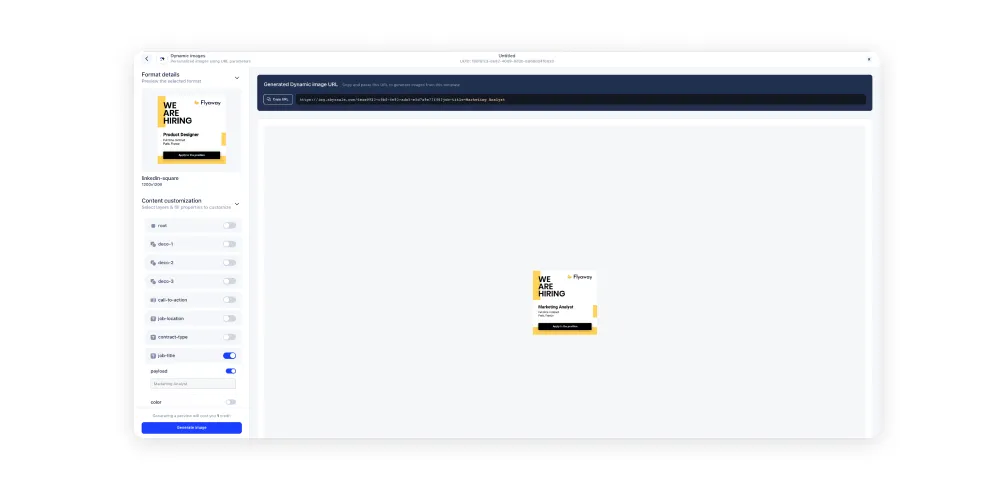
Then, each time you switch on a layer button you can see your URL changing in the preview section on your right. Once you're done, copy your URL.
Now, we'll go to LinkedIn to select our contacts. As for this campaign we have a Marketing officer open position, we’ll search for marketing profiles. For instance, let's target Hubspot employees for this search and add the filters needed to match the job requirements.
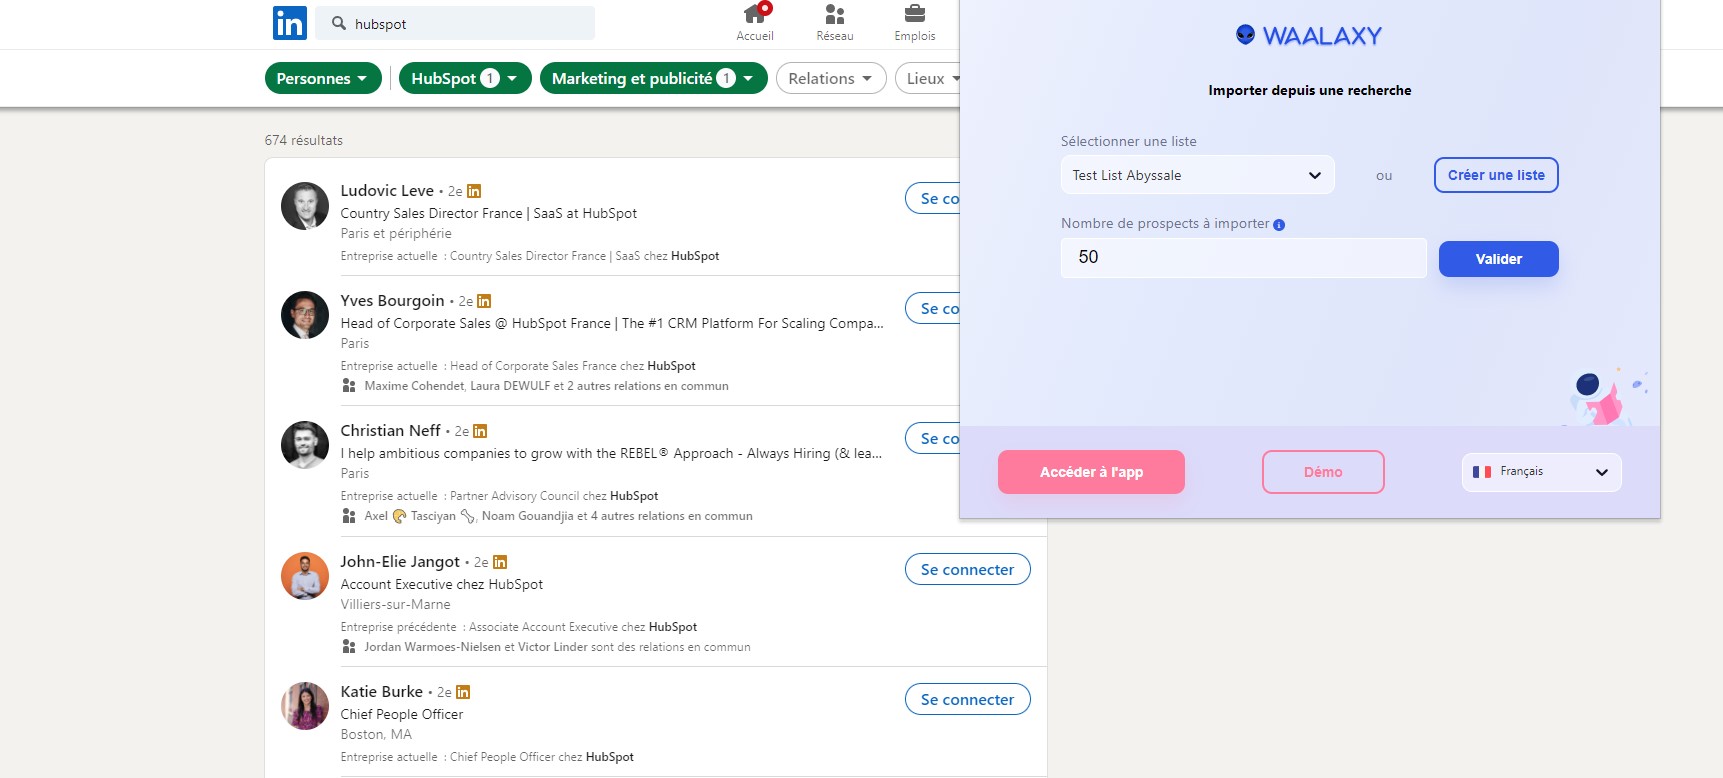
Once we have applied all our search criterias and that we’re satisfied with the list of contacts, it’s time to import.
Click on your Waalaxy extension, select the list you will send these contacts to, or create a new one. You can also limit the number of contacts imported. In our search there are 674 results, but we will only import 50 contacts for this example.
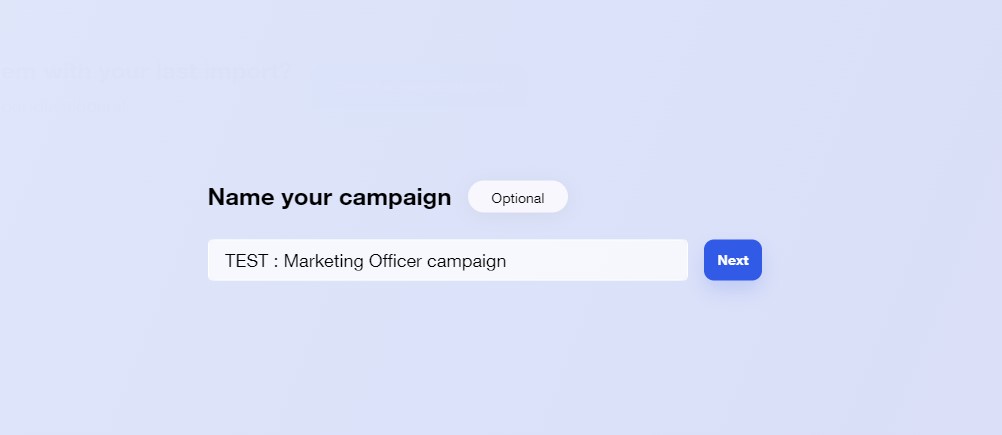
Once the import is done on Waalaxy, we click on “start a campaign” > Message. You can choose really any kind of campaign you want. For our exemple we chose a simple messaging campaigns in order to just propose our job offer in our prospective candidates direct messages.
We first, name our campaign
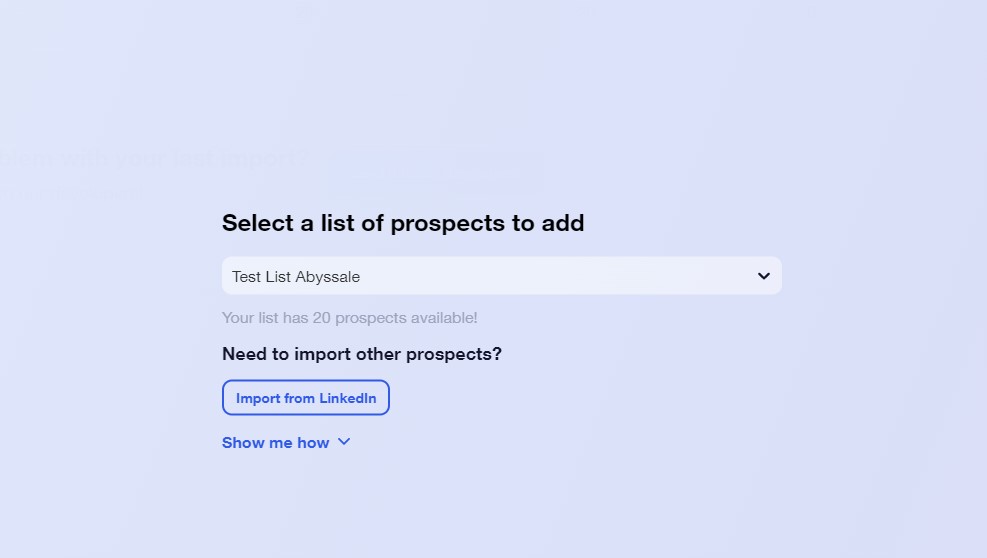
Then select our contact list
Now comes the message editing part. You can write your message or use an existing template.
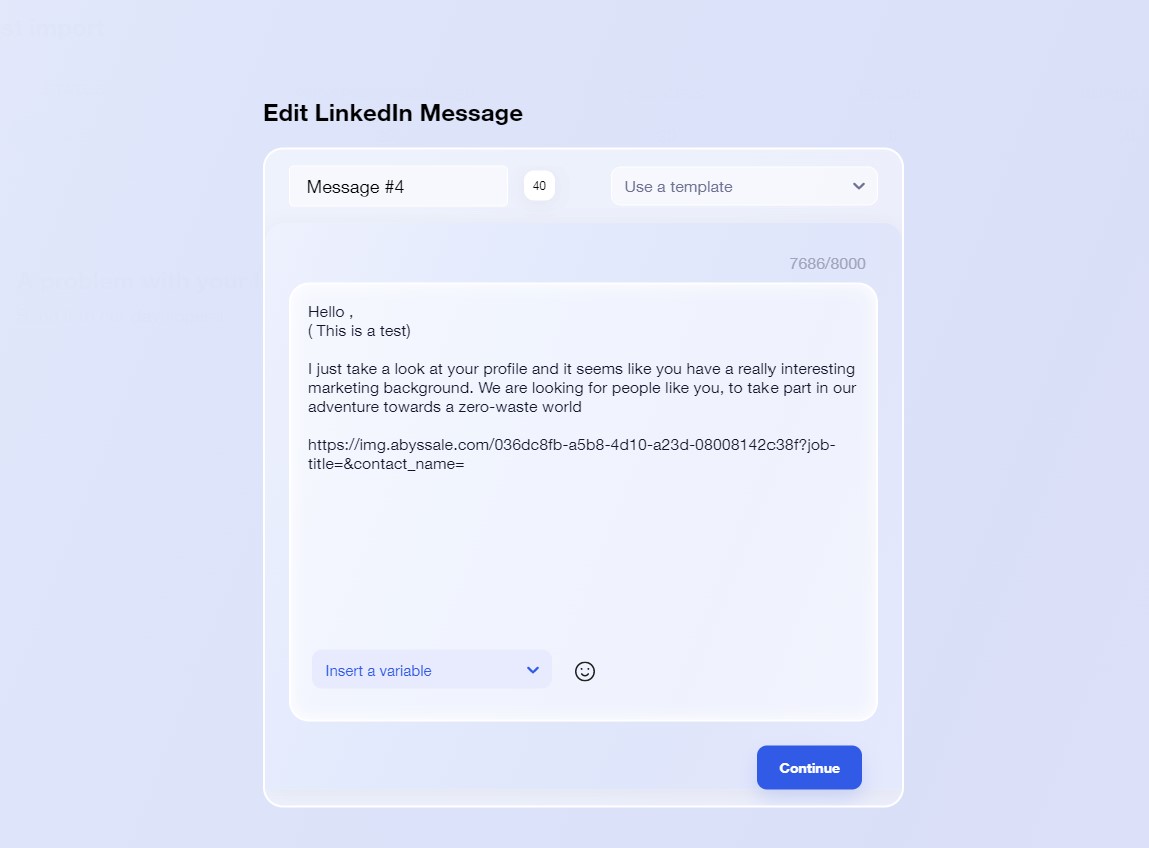
Once your text is written, you can add your dynamic image URL by pasting it. Here is ours :

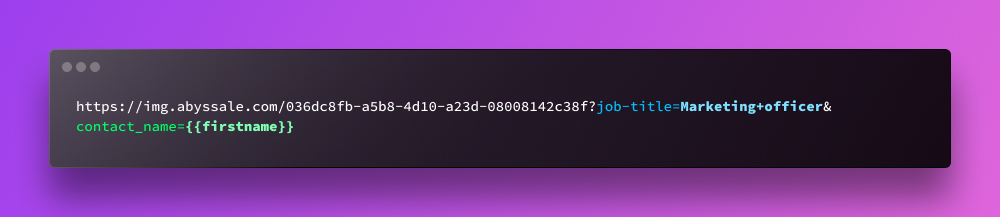
You can see in blue, our job-title layer and in green our contact_name layer. The last step is to customize your URL for this campaign and include your contact properties inside the dynamic image URL.
Our first campaign will be for a Marketing officer position. As it is written marketing analyst in our original template we’ll customize that layer by simply adding Marketing officer right after our job-title layer.
To personalize our visual and insert our contact's first name inside the image, we’ll add a First name variable right after our contact_name layer. For that, we just click on “Insert a variable” at the bottom left of our message window, select the variable and insert it inside the URL.
The URL should look like this:
Just click on continue to save your personalized linkedin message image and send it to your contact list.
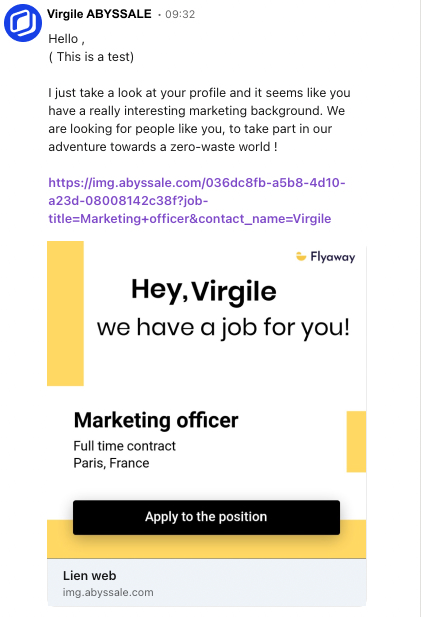
Here is a screenshot of our message sent with our personalized linkedin image.
Now let’s say, we have several positions opened, just create a new campaign with new contacts for each position. Just by changing the job-title parameter, your visual will automatically update and still insert the first name of your contact inside the image!
Congrats, you're now ready to send your first Linkedin cold messaging campaign with personalized images! 🎉
Explore our guides and tutorials to unlock the full potential of Abyssale's spreadsheet feature for scaled content production.